In Home Assistant, time-of-use cost means a utility_meter with tariffs, an automation to switch zones, and template sensors. For the house total that's an evening's work and it holds up. It's per circuit that it stops scaling: the tariff entities multiply by every circuit you add, and the Energy dashboard won't show you per-tariff cost per device however many of them you build.
RBgrid does that part on the hub. You enter your tariff in one place, and every measurement point's energy is priced at the zone it was used in — every 15 minutes, at the zone in effect then, stored alongside the hourly record. What you read back is each circuit's cost for a period, with the zones already accounted for: today's kitchen, last month's heat pump, at the prices that actually applied.
Be clear about what that is and isn't. It's not a per-zone breakdown per circuit per month — the app has no such view, and the What this doesn't do list at the end says so plainly. It's the per-circuit money, correct to the zone, which is the part the Energy dashboard can't give you.
What you need: an RBgrid hub with at least one measurement point that already shows live power. If you're starting from scratch, see A power meter for Home Assistant or Get started.
Don't have a hub yet, or want to see whether your tariff fits this model before you buy anything? The tariff editor in the demo is the real one, with demo data behind it. Try your own zones in it while you read.
1. Open the tariff
In the RBgrid app, open Management → Tariffs. The hub keeps one tariff plan; you edit it here.
Fill in the plan settings:
- Plan name and Provider, for your own reference.
- Currency.
- Plan type: Multi-zone, which is what gives you the zones below.
- VAT %, as on your supplier's price sheet.
- Default zone: the zone that covers every hour no other zone claims. Pick it once you've added your zones in step 2.
Enter every price without VAT. The buy prices and the three charges below are net; the hub adds VAT itself, on top. If you type the VAT-inclusive price from the front of your bill and fill in VAT %, every cost comes out too high by your VAT rate. Supplier price sheets usually show both: take the ex-VAT figures from the small print.
Nothing is written to the hub until you press Save. A bar at the top of the page tracks it — No unsaved changes, The tariff has unsaved changes, or Fix the fields marked red — and saving applies at once, with no restart.
⚠️ Come back to this page after any restart. On v1.1.4 a hub that restarts — a power cut, a reboot, a firmware update — comes back running its built-in placeholder plan, Test Day/Night. Your plan is still safe in the hub's storage, but it isn't the one in use until you open Tariffs and press Save again.
This matters most for the restart you don't see. A power cut at 02:00 hands you two problems at once: the hub is on the placeholder's prices, and until its clock syncs it also picks the zone from whatever time it thinks it is. Energy used in between is costed at those prices and stored like any other record. Re-save the plan, check Settings → Time shows synchronized, and treat the figures from that window as suspect.
A fix is on its way. Until it ships, this is the one thing about tariffs worth remembering.
2. Add your zones
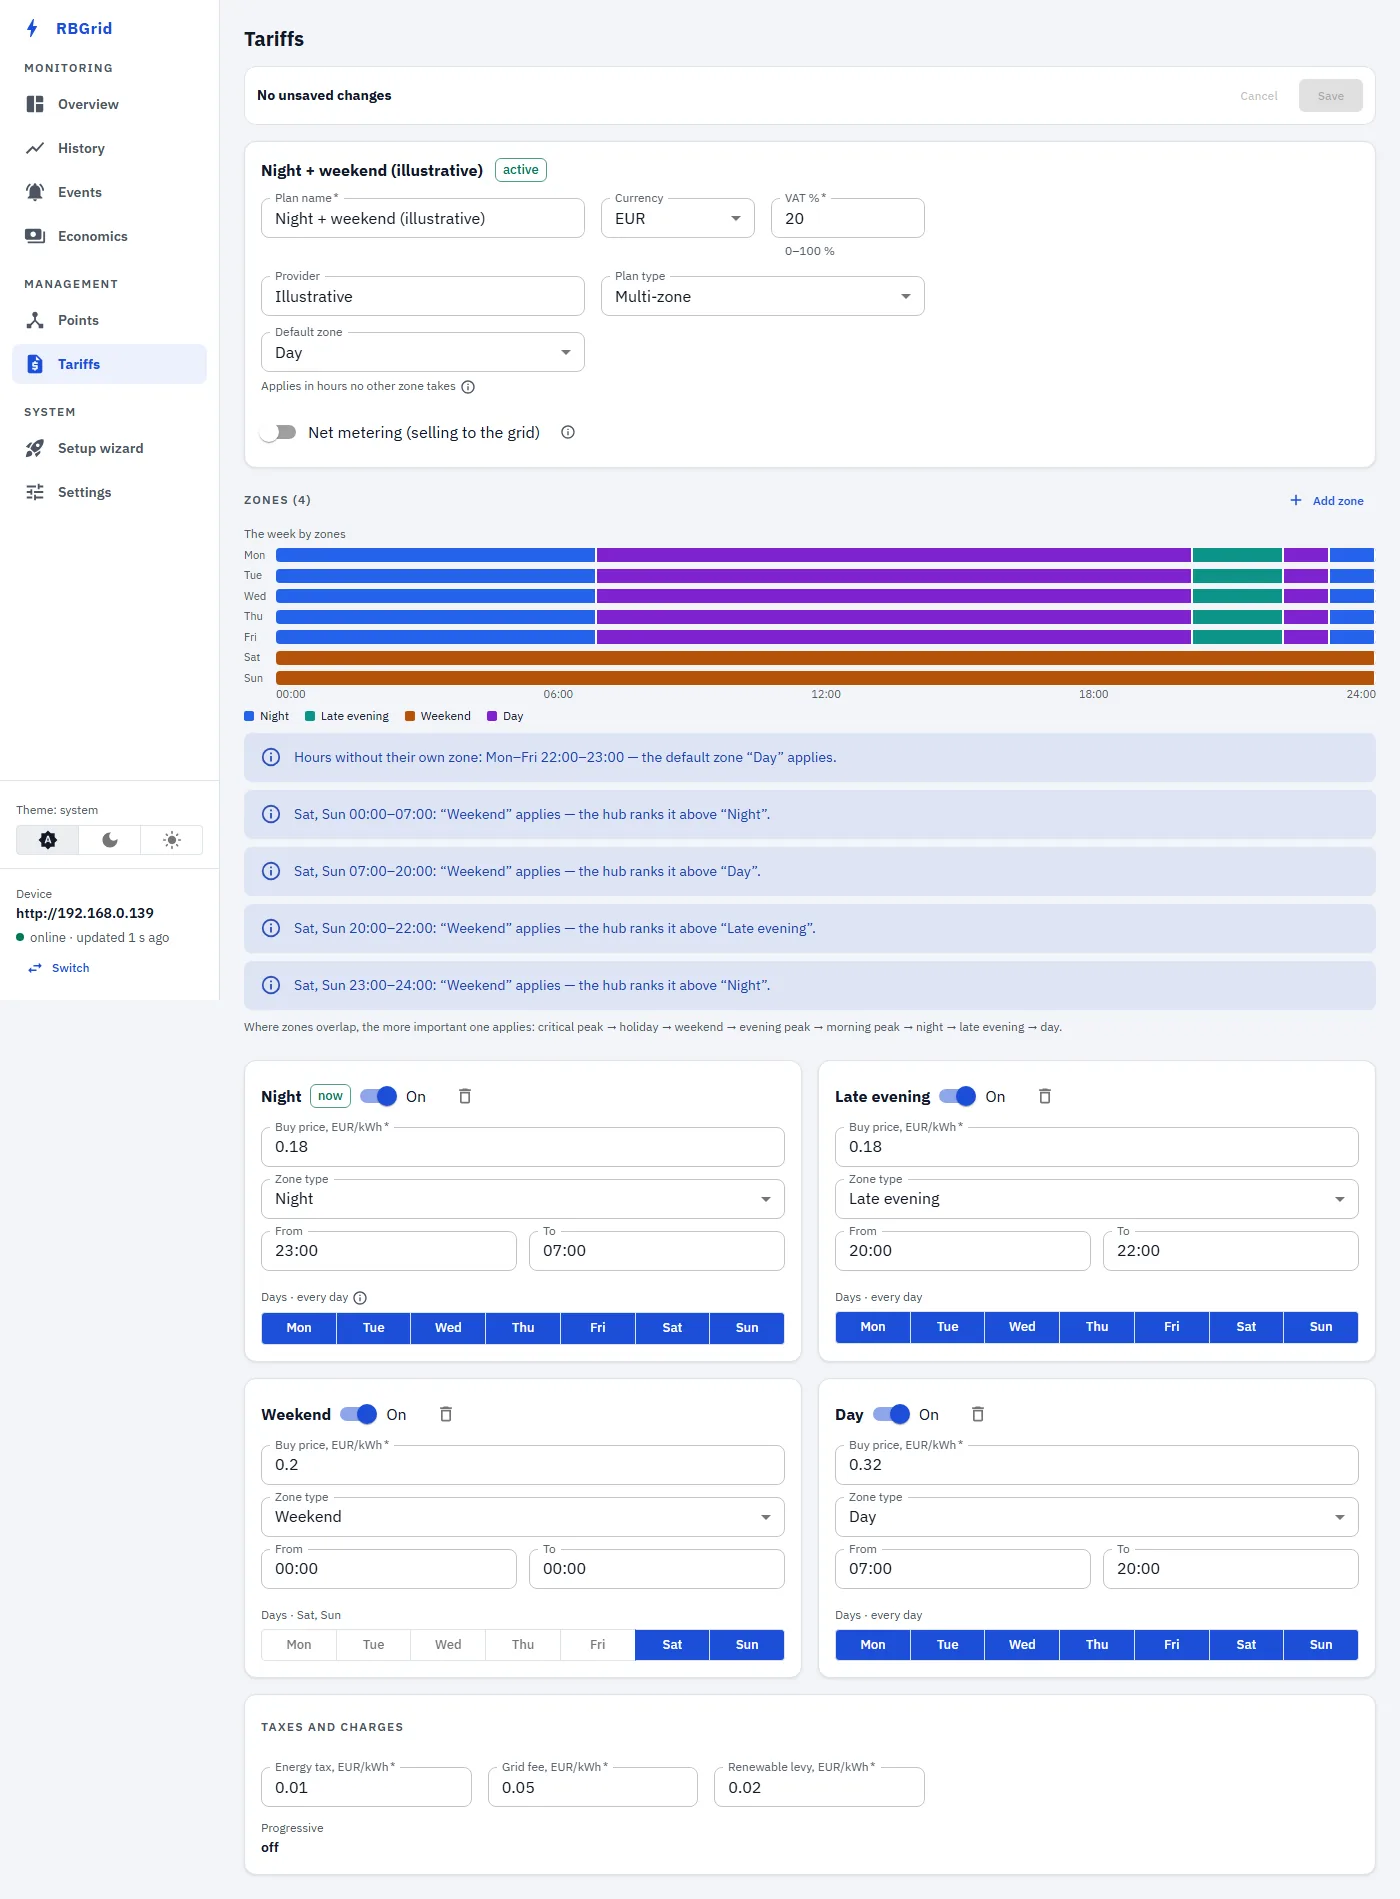
A zone is a price that applies in one time window, on the days you pick. Here's the plan used throughout this guide. The prices are illustrative; use your own.
| Zone type | From – To | Days | Buy price |
|---|---|---|---|
| Night | 23:00 – 07:00 | every day | 0.18 €/kWh |
| Late evening | 20:00 – 22:00 | every day | 0.18 €/kWh |
| Weekend | 00:00 – 00:00 (whole day) | Sat, Sun | 0.20 €/kWh |
| Day | 07:00 – 20:00 (default zone) | every day | 0.32 €/kWh |
Add zone creates one, with a type that isn't in use yet. For each zone, set Zone type, Buy price, From / To and Days, and make sure it's On. A window can cross midnight, like the Night zone above. From and To set to the same time, like the Weekend zone's 00:00–00:00, mean the whole day: that's how you make a whole-day zone, so don't do it by accident.
A plan holds up to seven zones, and Add zone greys out at seven. Since Holiday isn't offered, that's one usable type per slot — so the two-windows trick below spends a slot you might want elsewhere. Worth planning before you fill them.
A zone type is a name and a place in the priority order below — nothing more. It doesn't imply hours: a cheap midday window, the kind a solar-heavy grid gives you, goes in whichever free type you like, with its own From and To.
Boundaries don't have to be on the hour. The hub prices each 15-minute quarter by the zone in effect at that quarter's midpoint, so a window starting at 07:30 is honoured; one at 07:20 takes effect from the quarter it falls in.
Set Day as the plan's Default zone, in the plan settings at the top. It then covers every hour no other zone claims, so you don't have to cover all 24 hours yourself. In this plan that's 22:00–23:00 on weekdays, the hour between the late-evening and night windows.
When zones overlap
Zones may overlap; the hub then applies the one with the highest-priority type. From the top: Critical Peak, Holiday, Weekend, Evening Peak, Morning Peak, Night, Late Evening, Day. The app prints that order under the week view, and names the winner for each overlap it finds. Holiday is in the model but not in the editor — holiday dates can't be entered, so you can't create one and it never wins anything; that leaves seven usable types for the seven zone slots.
A Weekend zone takes that high rank only on the days it's set to. In the plan above, Saturday 02:00 is both Night and Weekend, and Weekend wins; Tuesday 02:00 is Night, because the Weekend zone doesn't run that day.
Two cheap windows in one day
Each zone has one time window. If your tariff has the same cheap price in two separate windows of a day, put the second window in a zone of another type with the same buy price — Night 23:00–07:00 and Late evening 20:00–22:00, both at 0.18, as in the plan above. The hub prices both windows at that price, and the second one shows under its own type's name in the week view and in Economics.
Two things to know before you do it:
- On the days a Weekend zone runs, it outranks both windows, so they don't apply there.
- If the second window overlaps the Night window, Night wins. With the same price in both, that changes nothing in the cost.
Use one zone per type. The hub doesn't refuse a second zone of the same type, but it only notes it in the log, and the two then share a single line in the per-zone split — so you lose the ability to tell them apart.
3. Add taxes and fees
Below the zones, enter the plan-level charges, each per kWh: Energy tax, Grid fee and Renewable levy. They're added to every zone's price, and VAT is applied on top:
Your bill almost certainly names its per-kWh lines something else. That's fine: the hub adds the three fields together and nothing else distinguishes them, so put your charges in whichever fields you like, and add two of yours together if you have more than three. Only the total per kWh matters.
cost = ( kWh × zone price + kWh × (energy tax + grid fee + renewable levy) ) × (1 + VAT / 100)
With the plan above — energy tax 0.01, grid fee 0.05, renewable levy 0.02, VAT 20 % — one kWh costs:
- in Night and Late evening: ( 0.18 + 0.08 ) × 1.20 = 0.312 €
- in Day: ( 0.32 + 0.08 ) × 1.20 = 0.48 €
Those are the figures the hub itself reports for that plan, not arithmetic done here.
4. Check the week
Open the week by zones view. It shows which zone applies in every hour of the week, including the hours that fall to the default zone, and it writes out what it did: which hours had no zone of their own, and which zone won each overlap.
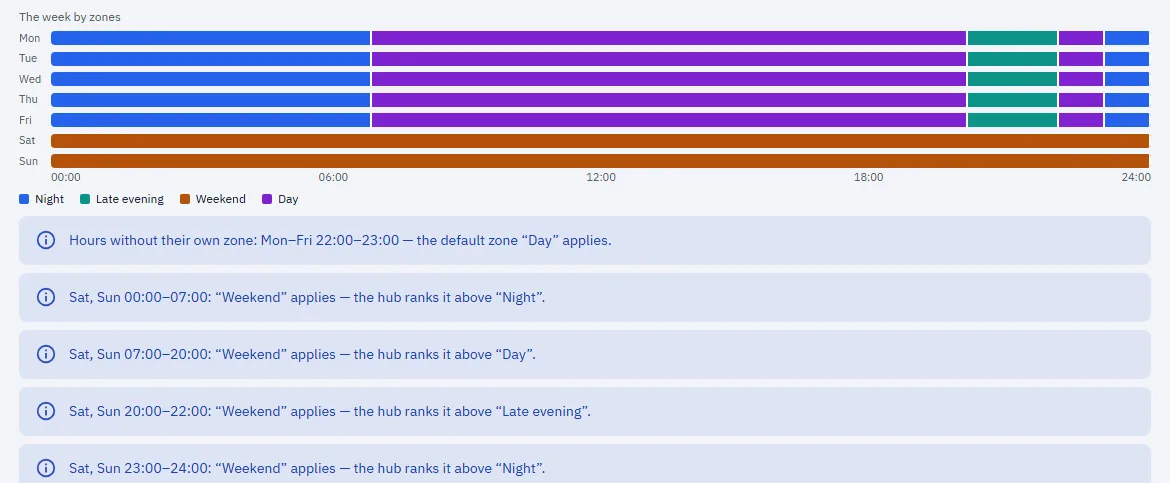
If an hour shows the wrong zone, check the zone's days, the overlap order above, and the hub's clock: zones are resolved against the hub's own time, not your computer's or Home Assistant's, so a hub with the wrong timezone shifts every boundary. Settings → Time should show the clock synchronized.
Selling to the grid? The zones here carry a buy price only. Export prices appear on the zone cards when Net metering (selling to the grid) is on, and export is valued separately from cost — that's a guide of its own: Monitoring a house that exports.
5. See the cost of each circuit
Open Monitoring → Economics, choose a point and a period: an hour, today, yesterday, the last 7 days, this month, last month or this year. You see that circuit's energy and its cost. One point at a time here — to put circuits side by side, use History with the Money metric, which draws the same stored cost as bars per point, stacks them against the house total, and shows what the measured circuits don't account for as a grey remainder. Download CSV saves what's on screen, and Summary by point saves one row per point for the period: imported kWh, cost, exported kWh and export value. Both files are built in your browser.
Economics also splits a point's cost by zone — but read that block for what it is: it's a running total that counts from the hub's last restart, it doesn't follow the period selector, and it starts again after every restart. There's no per-month cost-by-zone view. For a month, use Economics with the period set to the month, which gives you that circuit's total, not a zone breakdown.
A limit to size for: the hub stores history for up to 12 points. Cost comes from those stored records, so twelve is also the number of circuits you can have cost and history for, however many channels you clamp.
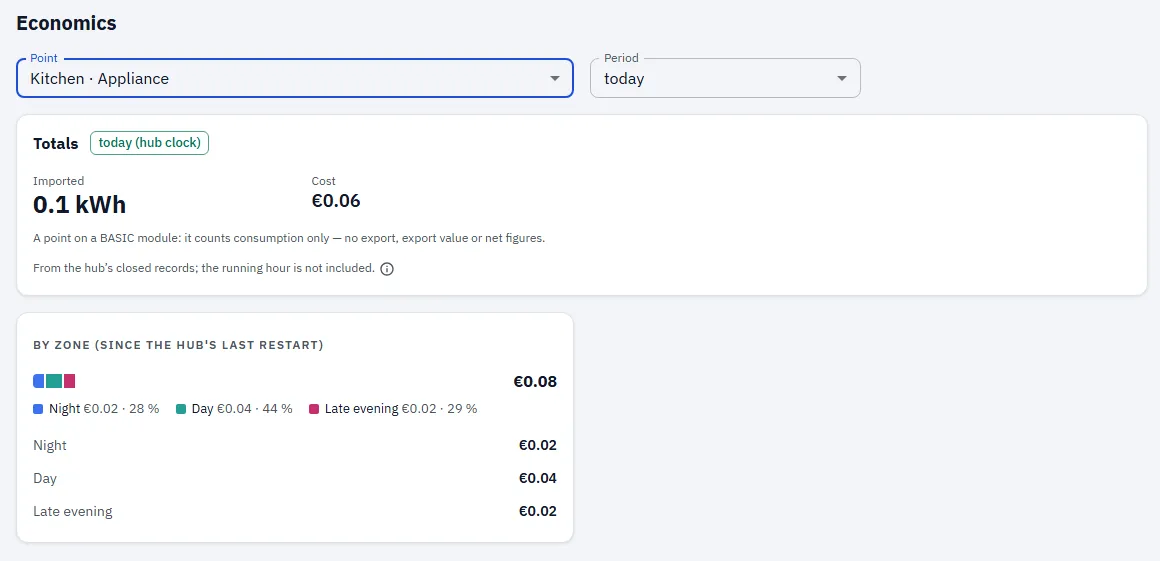
The two figures in that frame don't add up, and they aren't meant to. Totals says €0.06 for the period — today. The by-zone block below says €0.08, because it has been counting since the hub last restarted, which was earlier than today. The app labels it by zone (since the hub's last restart) for exactly that reason. If you ever find the two disagreeing, this is why.
Before you trust a figure here, be sure the plan behind it was yours: on v1.1.4 a restart drops the hub back to its placeholder prices until you re-save (see the warning in step 1).
6. And in Home Assistant?
Home Assistant gets the energy of every point, which is what its Energy dashboard runs on (see the first guide in this series). Costing that energy is Home Assistant's own job there: you give it a price, it prices what it has.
What this guide buys you is the part the dashboard can't do — cost per circuit, at the zone the energy was actually used in, computed on the hub and kept with the record. That stays in the RBgrid app, next to the history and the CSV export.
So the two don't compete: HA keeps doing the whole-house picture the way you already have it, and the per-circuit money lives here.
What this doesn't do (yet)
- Fixed charges (a monthly standing charge, for example) can be entered but aren't included in the cost. Costs are per-kWh only.
- Holiday is a zone type in the model, but holiday dates can't be entered, so the editor doesn't offer it and a Holiday zone never activates.
- Hourly or spot-price tariffs aren't supported. Fixed schedules work today; dynamic prices are on the roadmap, not released.
- No cost by zone per period. The zone split is a running total since the hub's last restart, so "how much did the night zone cost me in October" isn't a view the app has. If that number is what you track, keep whatever gives it to you today.
- The charges are flat across zones. Energy tax, grid fee and renewable levy are added to every zone alike, and there's one VAT rate for the plan. A distribution charge that is itself cheaper at night can't be expressed; put in the rate you're on most, and know the other zone is approximate.
- No future-dated prices. When a rate changes mid-month, you edit it on the day: energy before the edit keeps the old rate, energy after gets the new one, and the month is a blend with nothing in the app marking the change.
- A restart drops the hub back to its placeholder plan until you save yours again — see the warning in step 5. Energy measured in between is costed at the placeholder's prices, so re-save before you read the figures.
- A hub that hasn't synchronized its clock still prices energy. It resolves the zone from its own clock whatever state that clock is in, so between a boot and the first time sync the zone — and the price charged — can be wrong, and those costs are stored like any other. Give a fresh hub its network and let Settings → Time show synchronized before you trust the first figures.
- One plan per hub; months are calendar months, not your supplier's billing period.
- Re-running the setup wizard's Tariff step rebuilds the plan — it clears taxes, fees and net metering and writes a simple one- or two-zone plan. It asks first. Use the Tariffs page for edits, not the wizard.
- RBgrid shows what your consumption cost at your rates. It doesn't check your supplier's invoice.